Fat Stash Bee – October Block

Yes! I’m already done with my blocks for October in the Fat Stash Bee. October was April‘s month. She asked us to do a garden fence block following this tutorial. I love her fabric selection for her quilt.

Here is the ones I received. Both are linen/cotton blends. They have a really nice texture.

Fat Stash Bee - October 

The FQ is London Turquoise cotton/linen canvas from the Echino Nico 2011 collection by Etsuko Furuya for Kokka. LOVE it! We had to use her FQ as the center piece or the outer fabric, the sand strip for sashing and complete with fabric from our stash.

I think April’s choice of block was a good one for her fabrics. The simple design will highlight the fabric prints. I dediced to continue in that direction by using her FQ as the center piece and using solid color Kona cottons as the outer fabric. I made two blocks, one in Purple and one in Pomagrante. These were the fabrics in my stash that best suited her FQ.

I had fun making those, chain piecing both blocks at once. They were quick and easy to do.

Fat Stash Bee - October

So here are here they are.

Fat Stash Bee - October 
I hope you like them April. My only regrets is that I won’t have any blocks to do for the bee until November!

First Day of Fall

Birds Encyclopedia - Floor pillow covers

I finished up my large floor pillow covers today. Just in time for Fall. I realize that yesterday while working on assembling them. I had seen this beautiful wall quilt in the Fresh Modern Quilts group pool on Flickr earlier in the day. It’s a quilt by Jolene Klassen from the Blue Elephant Stitches blog. By reading her blog post, I learned that she was participating to the Celebrate Color for Fall contest hosted by Rachel Hauser on her blog Stitched in Color.

Celebrate Color

So while sewing I had this on my mind, and I realize that my pillow colors were indeed fall colors. And  what a coincidence, I would be able to finish them up on the First Day of Fall! They were perfect for Rachel’s contest.

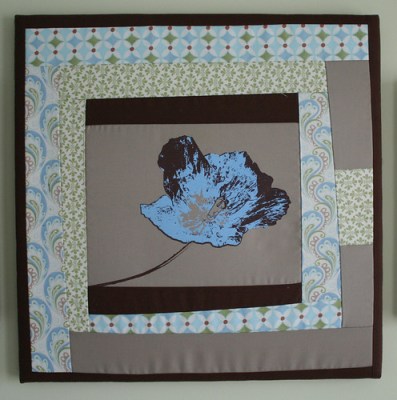
I bought the main fabric, the one used for the center pieces and binding, last Fall. It’s a Moda fabric from the Harvest collection by Blackbird Designs. I had a crush for it and tough it would be perfect for my living room which is all in soft colors. I wanted to had some colors, but nothing too saturated. So I found those greens, reds, yellows, browns and creams that fitted well with the birds fabric.

Birds Encyclopedia - Floor pillow covers

The pillow cover design is of my own. In fact, I’m currently working on writing a pattern. For those interested, I’ll keep you updated once it’s ready. I also made the design for the quilting which I transferred on the fabric using white Saral transfer paper.
The white wasn’t ideal for the cream fabric but great with the other colors. It
did a fairly good job and it all went off after I washed the pillow
covers. My only comment is that it does come off by rubbing. So moving
the fabric around while quilting did make some lines partly disappear. Anyway, I was only using the design as a guideline. I preferred that over
the Glad Press’n Seal technique which I had used for the table runner. It’s a bit messy when you try to remove the film after the quilting is done.

Birds Encyclopedia - Floor pillow covers 
Birds Encyclopedia - Floor pillow covers

For the back, I used a home decor weight cotton in cream that I had in my stash. I finally decided to make an envelope closure.

Birds Encyclopedia - Floor pillow covers 

For stitching the binding, I tried Malka Dubrawsky’s technique from stitch in dye. She top-stitches the binding in place using a zig zag stitch on her sewing machine. She shows this in different projects in her latest book Fresh Quilting. I like the result. But, I did have a bit of difficulty with the first corners.

Birds Encyclopedia - Floor pillow covers

I think my two little boys are going to like those pilllows. Particularly the younger one (21 months), which loves looking at the birds and singing “Tit-tit-tit-tit-tit” when he sees one on the electrical wires in the backyard. There is plenty of them because just behind our house there is a field (photo taken last fall).

Have a nice Fall everyone!

Fat Stash Bee – 1st Quilt Finished

I’ve completed my 1st quilt with some of the blocks I got from the Fat Stash Bee for my month. I’m pretty happy with the result.

Fat Stash Bee - 1st Quilt Finished

As I said in a earlier post, I used a meandering pattern for the quilting. I like the way it turned out. It was my first time at it. It took me about 4-5 hours to do it. The stitch length is not equal. But for a first time, I think it’s not too bad.
Fat Stash Bee - 1st Quilt Finished

For the back, I used a black and white polka-dot flannel and for the binding, a Kona cotton in Tomato. I love the contrast it makes on both sides.
Fat Stash Bee - 1st Quilt Finished

I just washed the quilt and I like it even more like this, with its crinkled look.
Fat Stash Bee - 1st Quilt Finished

My only regret is the white solid cotton I’ve used for the sashing and borders. It is close to the Alexander Henry Starling fabric, but not the same. It is more blueish and depending on the light it shows. For the second quilt I’ll make with the remaining of the blocks, I’ll use a linen/cotton blend in natural. I think it will look better. Still, I think white was the best choice for this one with the B&W fabric I chose for the back. I just hope my friends won’t be reluctant to use it with their little baby girl because it’s white. I’ll be sending them in the coming days. I hope they like it!

Fat Stash Bee – September Block

For the month of September, we were asked to do a block from the Freshly Peced blog: “Hexing Around Block”. It consists of an hexagon with four concentric rings. We were provided the center piece and were asked to do the rings in four complementing colors. We were also provided with an FQ of a solid color cotton for the background and two stripes for two of the rings. Here is what I’ve received for those:

Fat Stash Bee - September fabric

We had to complete with fabric from our stash. Here is the result.

Fat Stash Bee - September block 

These blocks were fun to do. My hexagons is a bit smaller than what is shown in the tutorial. I’m using my 1/4″ seam foot from Janome, but I feel my seam allowance is a tiny bit larger than 1/4″. I’ll have to measure this!

Christmas Furoshikis!

Furoshikis for Holiday gift wrapping!, Already! you’ll say. Well, the Holidays are not that far away. Last year, me and my sister found some nice Christmas cotton prints. We decided to make some Furoshikis to sell on Etsy. But, by the time we ordered the fabric, received it and actually made the furoshikis, it was much to late to sell some. We used a few, but we still have some left. So, this year I won’t wait until the last minute. I already put them back on my Etsy shop.

For those who don’t know, a furoshiki is a square hemmed cloth of various sizes, colors, and designs. They can be used to wrap, store, or carry things. Me and my sister made some using different cotton prints . One of the print are candies candy jars on a moss background, the other is featuring snow flakes and snow man polka dots on a black background, and the last one is reversible: white buttons on a red background on one side and Christmas prints on a aqua background on the other side. They are all cute. And we made them in different sizes depending on the gift you want to wrap: 12, 18, 28 and 40 inches square. This was a fun project to do!

Christmas Furoshikis

Fat Stash Bee – 1st Quilt

June has passed and even though there was some delay due to the strike at Canada Post, I received all my blocks from the Fat Stash Bee. I got all my blocks and much more: 20 in total. Thanks to everyone in the bee for your generosity. I had asked to do crazy scrappy blocks following Aneela Hoey’s tutorial in red, pink, green and blue. I had planned to do a baby quilt with the 12 blocks, 3 of each color. In the extra blocks, I received much more pink and red. So, I’ve decided to stick to my original plan, but to make a second baby quilt in pink and red with 5 of the blocks, Alexander Henry’s Starling fabric and white sashing and borders. I’ve started with this one. Here is the quilt top done.

Fat Stash Bee - June - 1st Quilt Top

I plan to use a black and white polka-dot flannel fabric for the back panel. I feel it’s softer for a little baby. I’ll try quilting it using a meandering stitch. And I’ll put some red binding. I’ve just ordered some Kona cotton in Tomato for this. I received it in two days. Thanks to Pam from Mad About Patchwork. It’s great to be able to order from Canada!

I want to give this to friends of ours who just got their second baby girl. I better hurry up!
I’ll keep you posted on what I’ll do with the rest of my blocks.

Large Floor Pillow and Table Centerpiece

I bought this nice fabric from Moda almost one year ago now. It’s from the Harvest collection from Blackbird Design. I thought the colors would look great in our living room. And the print is like a page from a bird encyclopedia. I didn’t get a chance to use it until recently. I’ve decided to make pillow covers for 2 large floor pillows (27″ x 27″) I bought from Ikea a few years ago. I’ve decided to assemble 4 log cabins for the front panel. But, I made them larger on one side and I did not orient them in the same directions, so they would look offset when put together. I’ve used the fabric from Moda as the main center piece and I chosed different coordinating frabrics for the rest, in cream, red, green, brown and yellow.

My pillows are not finished yet. But, here is a picture of the assembled blocks. I still need to quilt this and sew the pillows back panel. I’m not sure yet what type of closure I will do. What would be best for large pillows like this? Any suggestions are welcomed.

Birds - Floor pillow covers

I had some fabric left. So, I decided to do 2 additional blocks to make a table centerpiece. I just finished up quilting and binding it. I’m happy with the result.

Birds - Table Centerpiece

The quilting design is of my own. And considering it’s the first project I do using free motion quilting, it’s not too bad.

Birds - Table Centerpiece

I’m going to give this to my step-mother for her birthday tomorrow. I hope she likes it!

Fat Stash Bee – August Block

This month block was really fun to do. Sarah wants to do a Confetti Block Quilt like shown in the book Block Party– The Modern Quilting Bee (take a look at their blog for more info).

As a framing fabric, she provided us a fabric with a yellow print instead of white. It is a fabric from Denyse Schmidt: Fairgrounds Modern Texture. With the FQ, she also sent us a small piece of Anna Maria Horner’s Loulouthi Summer Totem to use for confetti. We had to complement this with other confetti from our stash preferably in soft blues, greens, yellows, and browns.

So here is my block. I hope you like it Sarah! I’m sure the quilt will be really nice.

Fat Stash Bee - August

Fat Stash Bee – July Blocks

For July, we were provided some photos as a source of inspiration.
2nd Quarter 3x6 Beehive 28 Inspiration

We were asked to use fabrics colors that remind us of the outdoors (grass, sky, sunrise, wildlife, etc). Sharon is doing a quilt for her husband. She asked us to think Old West, prairie, sunrise/sunset, ranch-y and she provided us a blue FQ. We were free to decide on the type of block.

When I saw this I thought this was the opportunities to try out Jacquie G’s tutorial on free pieced chevron. When I saw her post 2 months, I found it really interesting and I kept in mind that I wanted to try it out. Those chevrons and Sharon’s theme inspired me Fields and Mountains. I made two blocks in which I used Sharon’s fabric as the sky. Here is the result:

Fat Stash Bee - July Block 1
Fat Stash Bee - July Block 2

I’m pretty happy with it. I hope you like them Sharon! Thanks to Jacquie G for her tutorial an her blog in general which I found really inspiring.

Wall Art Mini-Quilt – Finished

I’m finally done with this project I started back in April (see previous post). It is three patchwork blocks that I decided to mount on stretcher bars (which are usually used for oil painting canvas). The first and central block is a wonky log cabin with a screen print I’ve done on fabric for the center piece.

Wall Art Mini-Quilt

The other two blocks are based on a tutorial by Elizabeth Hartman: Mod Mosaic block.

Wall Art Mini-Quilt
Wall Art Mini-Quilt

I’m happy with the result. It brings some joy to our bedroom and my bed wall is now less empty.

Wall Art Mini-Quilt 

However, I regret using not so good fabrics for the brown and tan, it made the process less enjoyable. One was really slippery and the other was thin. These are leftovers from other projects. I have learn my lesson. It’s the last time I use non quilting cottons for doing patchwork projects.